Blogging seems to be seeing fewer and fewer days so please come find us on Facebook!


Just to wet your appetite, here are a few. Of course the Oh Fiddlesticks ladies. The La*tee*da*kids cowgirl print skirt that I created for the shoot. Hair accessories from Georgie Blue, Anna and Blue Paperie, Finley and Oliver, Anders Ruff Custom Designs, something for Mom from Modern Vintage Boutique! and even a gift Certificate from Hill Country Charm. There is so much more. For the complete list of all 24 vendors, check out the Oh Fiddlesticks blog for ALL of the scoop on prizes and the details to enter. Good luck!


Well, fastforward years later, I haven't gotten tired of our trips and certainly not tired of getting our photos. When I create new pieces, I usually aim for tons of pattern and lots of color splashes. With the "Beaches 'n Cream" collection, I went in a different direction staying true to my love of white tonals for the beach and a few hints of pattern. You'll find something for everyone here in this mix and match collection. If she loves to twirl we've got the twirl skirt and double ruffle tank. If you want something angelic, simple and innocent, a ruffle trimmed pillowcase dress and finally I added a coordinating knot top with ruffle trimmed white flare capris. Aaaahh, Mother Nature, please bring the warm temperatures back and let's head to the beach! Let them play, let them be kids.......and finally, capture their sweet innocence with some beautiful photos while you are at it!
HUGE thank you to Michelle Nicoloff for getting some amazing photos of these 2 girls playing in my La*tee*da pieces. If you live in the Orange County area, take a looksie at her work....beautiful and amazing talent! 
Pieces will be listed this weekend in my Etsy store. If you have a Spring Break trip coming up and you are heading to the beach, contact me and we'll see about getting some rush orders out. Click on any photo to see them enlarged.


***click on any photo to see them enlarged***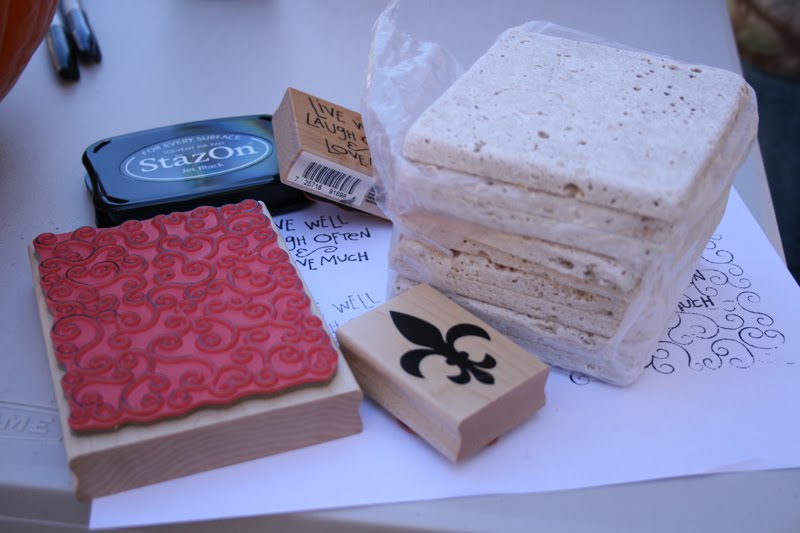
Here's what you'll need
* a set of 4" tiles - I grabbed a pack of the tumbled tiles from Home Depot - I prefer the look of the tumbled ones
* Staz on Ink Pad - whatever colors you like
* Rubber Stamps
* Clear Satin enamel spray to seal (not shown in this pic, you'll see what can I used later in this tutorial)
* Felt or cork stick on surface guards (i used 3/8") (photo'd and shown later in this tutorial)

First start by just wiping the tiles clean with a damp cloth so they are ready for you to put your design on. I experimented with what I wanted to put on my tiles on a piece of paper. For this particular set, I have a friend who is a HUGE New Orleans Saints fan, hmmm, these might be perfect in her house! There are so many fun rubber stamps out there for you to be creative with. For my set I chose a swirly pattern for a background and then overlayed it with my fleur de lis stamp. You could choose a smaller print and just do a repeated stamp across the tile. Place the stamp randomly where sometimes only half of it is seen along the sides or corners, it looks pretty! Another idea might be to put some words or an initial in the center and then stamp the 4 corners with something giving it a border. Just use your imagination and experiment on a piece of paper before the tile so you can see what direction you want to go. If you were more ambitious, you could also get stencils for a pretty pattern and just use a block rubber stamp to fill in the design with the ink.
My son is 5 (there he is pictured above in action) and he helped me with these so even the young ones can get in on the fun of being creative!
Using the Staz On Ink, apply whatever design you like to your tile. Be sure to press firmly with your stamp and then let dry.
Once your design is dry we need to spray a sealant on the tile. We don't want your ink to bleed so it needs a sealant. Use what brand you like, I've used a can of the Valspar clear satin spray that you can pick up at Home Depot or Walmart. Find a piece of cardboard or better yet a box and spray a coat onto the tile. Do this outside in a ventilated area. A box is best if your day is a little breezy. Now let this coat dry.
Now that they are dry, stick on your cork or felt guards to the bottom so they won't scratch the surface that they sit on.

That's it, you are done! Put them out on your side tables to use or stack them and tie up with a pretty piece of ribbon for a gift. Hope you had fun flexing those creative muscles!
***click on any photo to see them enlarged***
*6 strips of fabric about 18-20" long by 1/2" wide, 3 for each band and you can mix up the colors how you like
*I rip mine along the grain to give it the shabby edges, this is just my preference* you can also just pull along the sides to fray the edges or just cut and leave them how they are
*Your sewing machine
*6 inch piece of elastic - I use 3/8" width
1. Cut your 6 pieces of fabric in whatever prints you plan to use
2. Layer them on top of each other and stitch together
3. You can place your pieces under anything heavy to hold in place or tape it down to your surface. I choose to put my needle in the "needle down" position to hold in place and turn the strips towards me to start braiding.
4. Braid the entire length. Try to keep the print side up when braiding so that you see the colors you want shown, not the reverse side of your print. You might want to play with it for a bit so you can see if you like a tighter or looser braid.
5. Stitch your ends together then repeat with the other strips of fabric. Trim off the excess fabric from each end.
6. I turned my 2 braided pieces at a slight angle to each other then straight stitched each side together.
7. Now stitch your elastic to each end of your headband that's forming. My measurements fit my daughters head (she has a big head :-), just cut your elastic longer or shorter as needed. Because these are braids, there is a bit of give through the braid. If you really like a neat finish, you can take some bias tape and wrap it around the exposed edges on either end covering the elastic and the end of the braid and stitch that down. It won't be seen but wanted to add that note if you like things nice and neat.
8. Voila, you are ready to wear it! Try these using ribbon or even bias tape for a faster project!


The skirt with a dark cranberry center does have a coordinating knot dress that goes with it if you have sisters to match. Thank you to Kristen from Kristen Duke Photography for taking some gorgeous shots for me. I've had this lucky opportunity to continue to meet amazingly talented folks here in the Austin area. Love your work Kristin! Check out her daughter, isn't she precious? 


 These 3 pieces have a retail value of $48. It might be nearing 100 degrees in your part of the country but it's a super cute skirt that my own daughter has been known to wear year round opting for a tank in the Summer. The Bella Collection was my best selling collection last Fall.