Who doesn't love a fun new bag right? My daughter has one that she used to death and then requested something in colors she wanted to choose. I thought it'd be so simple to recreate so follow along this tutorial to make a simple sling bag that's also reversible. This is a great project for a beginner!
Now you may ask, why this sling bag over other tutorials you might find? I've always found them to have the pieces cut so where you see a seam and a break in the fabric pattern right down the center of the bag. It's just my preference not to have that visible seam, hence why I did my own tutorial. I don't like to break up my pretty pattern so prefer keeping the seam along the sides where it belongs.
First you'll figure out what fabrics you'd like to use. You'll be cutting a 32" length piece from both your exterior and your interior lining fabrics.
*****Lil side note :) Yes, I know this uses a lot of fabric and maybe in your stash you have smaller pieces you'd like to use. I loved creating this with the knotted strap. Why? well I love combining and seeing different prints with completely different patterns and scale. The eye is drawn to actually notice the interior print when the strap is knotted. It's how I used to create clothing for my girls using lots of bold mismatchy prints and I guess I naturally opted for that when making this bag. Plus, it's girly, like having a big pretty 2 sided floppy bow on the top of your bag.
I plan to make another and offer the alternative at a later date to use less fabric and have less waste (we hate wasting fabric right?) by showing how to do the straps so they are connected together vs. knotted. When I can calm my ADD and get back to this project I'll show and post that variation!*****
***Click on any pictures in this post to see them enlarged and for closer detail***
First you'll print and piece together your pattern piece. You can download and print HERE I've uploaded just a section of the piece. You will tape it where indicated to a regular 8 1/2" * 11" piece of paper and then along the straight edges of the strap, you'll just continue this on 10 extra inches. I traced my pattern piece shown above onto a poster board because I like something hefty to trace around. My poster board wasn't long enough but I can eyeball the strap extension but just want to clarify why my piece doesn't extend to the end. I love a project that you can eyeball which is why this is such a great project for a beginner.
You will be cutting out 2 identical pieces from each print so 4 pieces total. It's very important to put the correct side of your pattern piece along the fold. Fold your fabric and place the short side along the fold and trace your pattern piece. If there is a direction to your print, i.e. if you have cats on your fabric, make sure you are situating your pattern piece and cutting so they aren't upside down.
You should have 2 pieces of each print and this is what they look like when unfolded.
From your scraps you will cut a piece that is 5 1/2" * 11" and this will be for your pocket. Again, if you happen to have a direction to your print, pay attention to that so that when you fold your fabric to create this pocket, it faces the direction you want.
I kinda skipped this stage snapping a pic but this is a pocket, easy peasy but I'll try and be clear on what I'm doing and where our openings are etc.
Fold your piece in half with right sides together and press a seam. Stitch your square shut on the 3 open sides but leave about a 2" hole open on the opposite side of your squares folded edge. After you've done that flip your pocket right side out through that opening and press all of the seams and corners out. Press those seams in where that hole is as you are about to stitch your pocket on and close that hole up.
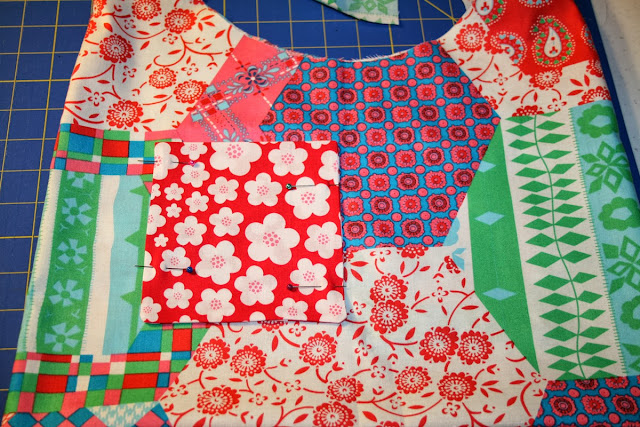
Pin your pocket in place wherever you'd like it. I do mine a bit off center but place wherever you like.
Look at the picture above this one where I have my black nippers laying in the photo.
Place your pocket so the side of the pocket that has the folded edge is on top and the part of the pocket that still has an opening that you used to flip is on bottom. I have my little nipper scissors sticking in them to show you. Stitch your pocket down on 3 sides making a U. Your pocket should be stitched on nice and secure now and your hole at the bottom should be closed.
Now take your bigger pieces and pin those together with the right side of the fabric facing each other. Stitch these together just along the 3 outer edges. **Leave the tops of your straps open. You will start and end along the long outer side seam!!***
Along the bottom of the bag we are going to create a base to it. This is a view from the bag's bottom seam. I have pulled it apart toward the corner and have matched up the bottom seam to it's side seam. I've marked a line about 2 inches from the corner. I eyeball this part and you can too after you get a sense of where to stitch on your first corner. Some folks would tell you to press this down, I'm much more informal about things! Just get a feel for it and go.
Stitch down that line getting a nice secure stitch and locking it at both ends. Do this to both corners and do to both pieces so you will do this 4 times.
Trim off the corner
Now you will need to nest these 2 identical pieces inside of each other with the right sides of the fabric facing each other again. Open up those strap seams and start matching them up and pinning. You will then stitch these 2 together along the straps at the top and then down along the curve of the bag and back up around to the straps on other side. Just follow it along the edge, you won't get lost!
BUT, in the mid section of the curve on one of the sides, doesn't matter which one, STOP stitching and leave about a 4 inch opening. This is what you will use to flip your bag inside out so we can see the pretty side of the fabric.
***For those of you that place close attn, I got ahead of myself taking pics :) This pic doesn't show where I've done the corners to the bag yet so if you are looking at this going, what's up? Mine doesn't look like that. Yours is right, I just snapped away before I'd done the corners.
Stick your hand in that hole, start flipping! You'll have to look for those straps and just press your hand down to the end and pull them both through. Push out all the corners of those straps getting as good of a corner as you can. I have a paintbrush in my sewing room and I just use the tip of the end to push out those corners on the straps.
It'll look a a mess at first. You'll just need to nest that inner lining into the outside part of the bag and it should look like this.
Push all of those seams to the edge as best you can. Now give your seams a GOOD press along the straps and along the U curve of your bag. When you come to the opening, you'll have to work with that section a bit better pressing in that seam. When you iron it nicely, it's so much easier to stitch things down.
Now you will simply top stitch along all of the seams. Just start at the top of one strap and follow the edge all the way around til you go around to the other strap and back to where you started from. Top stitching gives it a nice finished look. While you are doing this you are also closing up the hole that you used to flip your bag inside out.
Knot together those 2 straps to the length that suits your fancy. So cute huh? This bag is reversible too so if your mood wants it, switch it to the other side. All of your seams are enclosed so no one will know the difference! If you want a pocket for both sides, just go back to that step at the beginning and put a pocket on both fabric prints.
So cute and colorful right? I've made a half dozen of these so far because I was enjoying using up some of the fabrics that I have on hand. I lead a small group of 7th grade girls in a bible study each week and I just thought these would be perfect to carry our bibles and study guides in.
And this one is just one of my faves...but then again, I am a shabby flower girl!


