Monday, April 7, 2014

Veggie Wrap .... the perfect Summer meal

Summer is quickly on it's way and of course it always makes me think of bathing suit season! The evidence of Winter needs to be undone with a little bit of sunshine to the skin, some added exercise to the daily routine and of course making some better choices come meal time.

I saw this veggie wrap on one of my favorite sites, The Pioneer Woman while perusing Pinterest. I'd been telling myself lately, I really need to get some more veggies in my own diet and this looked like a recipe I definitely wanted to give a try. I made some changes to suit my own tastes and the result was delish!


In the photo above are all the ingredients I used except for some Balsamic Vinaigrette that isn't shown.

1. Spinach wraps (but really grab whatever you want)
2. I used Sabra's Supremely Spicy hummus because I like lots of spice
3. red onion
4. roasted red peppers in a jar
5. jar of artichoke hearts
6. crumbled feta
7. small avocado
8. mixed greens
9. Balsamic dressing


First off dice some of that red onion and put it in a pan with a little butter and cook them til they are carmelized.


Next I prepped the other ingredients. I diced up my artichoke, some red peppers, gave a good crumble to the Feta to get those big chunks broken down so it can spread throughout the wrap better and then diced about 1/4 of a small avocado.


I took my wrap, put it on the stove and lightly browned it on each side in a. Not sure why but tortillas have this plastic taste to me straight out of the bag and giving it a little grill in the pan makes it taste better.
Then I just put a good smear of the hummus through the center.


Next I just layered the other ingredients. First the grilled onions, then the red peppers, the artichokes, feta and topped by my favorite diced avocado. I added avocado to this wrap because I love the taste, texture and it just leaves me feeling quite a bit more satisfied. Plus, avocados are the good fat right?


After that I just topped with some mixed greens to give it some bulk and just lightly drizzled with the Balsamic vinaigrette dressing.


Now just wrap it up, add a toothpick to each side, cut in half and enjoy! You will love all the different flavors and textures in this dish. I think half the wrap with some soup would be a super lunch. 

Curious what this totals for calories? Well I can't guess the quantity you will put on your wrap but if you put in moderate amounts of ingredients your total wrap is going to be about 425-450 calories.

My kids even gave it a try and they gave it a decent review. I've modified it a bit for them. They aren't fans of artichokes so they get nixed, we used a milder flavor of hummus (just the roasted red pepper version) and then we added some turkey.  

Sunday, September 22, 2013

BOHO Sling Bag Tutorial


Who doesn't love a fun new bag right? My daughter has one that she used to death and then requested something in colors she wanted to choose. I thought it'd be so simple to recreate so follow along this tutorial to make a simple sling bag that's also reversible. This is a great project for a beginner!

Now you may ask, why this sling bag over other tutorials you might find? I've always found them to have the pieces cut so where you see a seam and a break in the fabric pattern right down the center of the bag. It's just my preference not to have that visible seam, hence why I did my own tutorial. I don't like to break up my pretty pattern so prefer keeping the seam along the sides where it belongs.

First you'll figure out what fabrics you'd like to use. You'll be cutting a 32" length piece from both your exterior and your interior lining fabrics.

*****Lil side note :) Yes, I know this uses a lot of fabric and maybe in your stash you have smaller pieces you'd like to use. I loved creating this with the knotted strap. Why? well I love combining and seeing different prints with completely different patterns and scale. The eye is drawn to actually notice the interior print when the strap is knotted. It's how I used to create clothing for my girls using lots of bold mismatchy prints and I guess I naturally opted for that when making this bag. Plus, it's girly, like having a big pretty 2 sided floppy bow on the top of your bag.

 I plan to make another and offer the alternative at a later date to use less fabric and have less waste (we hate wasting fabric right?) by showing how to do the straps so they are connected together vs. knotted. When I can calm my ADD and get back to this project I'll show and post that variation!*****

                  ***Click on any pictures in this post to see them enlarged and for closer detail***


First you'll print and piece together your pattern piece. You can download and print HERE I've uploaded just a section of the piece. You will tape it where indicated to a regular 8 1/2" * 11" piece of paper and then along the straight edges of the strap, you'll just continue this on 10 extra inches. I traced my pattern piece shown above onto a poster board because I like something hefty to trace around. My poster board wasn't long enough but I can eyeball the strap extension but just want to clarify why my piece doesn't extend to the end. I love a project that you can eyeball which is why this is such a great project for a beginner.

You will be cutting out 2 identical pieces from each print so 4 pieces total. It's very important to put the correct side of your pattern piece along the fold. Fold your fabric and place the short side along the fold and trace your pattern piece. If there is a direction to your print, i.e. if you have cats on your fabric, make sure you are situating your pattern piece and cutting so they aren't upside down.


You should have 2 pieces of each print and this is what they look like when unfolded.


From your scraps you will cut a piece that is 5 1/2" * 11" and this will be for your pocket. Again, if you happen to have a direction to your print, pay attention to that so that when you fold your fabric to create this pocket, it faces the direction you want.
I kinda skipped this stage snapping a pic but this is a pocket, easy peasy but I'll try and be clear on what I'm doing and where our openings are etc.

 Fold your piece in half with right sides together and press a seam. Stitch your square shut on the 3 open sides but leave about a 2" hole open on the opposite side of your squares folded edge. After you've done that flip your pocket right side out through that opening and press all of the seams and corners out. Press those seams in where that hole is as you are about to stitch your pocket on and close that hole up.


Pin your pocket in place wherever you'd like it. I do mine a bit off center but place wherever you like.
Look at the picture above this one where I have my black nippers laying in the photo.

Place your pocket so the side of the pocket that has the folded edge is on top and the part of the pocket that still has an opening that you used to flip is on bottom. I have my little nipper scissors sticking in them to show you. Stitch your pocket down on 3 sides making a U. Your pocket should be stitched on nice and secure now and your hole at the bottom should be closed.


Now take your bigger pieces and pin those together with the right side of the fabric facing each other. Stitch these together just along the 3 outer edges. **Leave the tops of your straps open. You will start and end along the long outer side seam!!***


Along the bottom of the bag we are going to create a base to it. This is a view from the bag's bottom seam. I have pulled it apart toward the corner and have matched up the bottom seam to it's side seam.  I've marked a line about 2 inches from the corner. I eyeball this part and you can too after you get a sense of where to stitch on your first corner. Some folks would tell you to press this down, I'm much more informal about things! Just get a feel for it and go.


Stitch down that line getting a nice secure stitch and locking it at both ends. Do this to both corners and do to both pieces so you will do this 4 times.


Trim off the corner 


Now you will need to nest these 2 identical pieces inside of each other with the right sides of the fabric facing each other again. Open up those strap seams and start matching them up and pinning. You will then stitch these 2 together along the straps at the top and then down along the curve of the bag and back up around to the straps on other side. Just follow it along the edge, you won't get lost! 

BUT, in the mid section of the curve on one of the sides, doesn't matter which one, STOP stitching and leave about a 4 inch opening.  This is what you will use to flip your bag inside out so we can see the pretty side of the fabric.

***For those of you that place close attn, I got ahead of myself taking pics :) This pic doesn't show where I've done the corners to the bag yet so if you are looking at this going, what's up? Mine doesn't look like that. Yours is right, I just snapped away before I'd done the corners.


Stick your hand in that hole, start flipping! You'll have to look for those straps and just press your hand down to the end and pull them both through. Push out all the corners of those straps getting as good of a corner as you can. I have a paintbrush in my sewing room and I just use the tip of the end to push out those corners on the straps.


It'll look a a mess at first. You'll just need to nest that inner lining into the outside part of the bag and it should look like this.


Push all of those seams to the edge as best you can. Now give your seams a GOOD press along the straps and along the U curve of your bag. When you come to the opening, you'll have to work with that section a bit better pressing in that seam. When you iron it nicely, it's so much easier to stitch things down.


Now you will simply top stitch along all of the seams. Just start at the top of one strap and follow the edge all the way around til you go around to the other strap and back to where you started from. Top stitching gives it a nice finished look. While you are doing this you are also closing up the hole that you used to flip your bag inside out.


Knot together those 2 straps to the length that suits your fancy. So cute huh? This bag is reversible too so if your mood wants it, switch it to the other side. All of your seams are enclosed so no one will know the difference! If you want a pocket for both sides, just go back to that step at the beginning and put a pocket on both fabric prints.


So cute and colorful right? I've made a half dozen of these so far because I was enjoying using up some of the fabrics that I have on hand. I lead a small group of 7th grade girls in a bible study each week and I just thought these would be perfect to carry our bibles and study guides in.


And this one is just one of my faves...but then again, I am a shabby flower girl!


Wednesday, July 3, 2013

Pine Cove Outback - Project 319

It's been so long since I've blogged and done anything crafty in my craft room. My machine has been quietly sitting in a corner and all my supplies and fabric have been untouched....until recently!

We are full swing into summer as is the rest of America! There are no such thing as the lazy days of summer as we fill the days with swim team, sports camps, church camps, hanging with friends and yes the kids favorite, sleep-away camps!

One that I particularly look forward to is my kids attending Pine Cove Outback I feel beyond blessed that my kids can attend a camp like this. Pine Cove is a christian summer camp that has absolutely changed my children and it will continue to be a camp that tops my list of where I will send my kids each summer.

Our first year to attend we learned about their Project 319 and we knew that we wanted to sponsor some children who'd never be able to afford to attend otherwise and may not ever hear the message of Christ. This year we have spun it a bit differently in our house and wanted our kids to sponsor some children. My oldest is at the babysitting age so she's getting used to putting in a portion of her money into a mason jar and is well on her way to raising the money. My younger daughter on the other hand doesn't have means to earn money like her sister so we've asked her cabin mates if they'd like to join us in helping to raise money to send a child to camp. They were all eager to help and we have reopened my craft space for business. These girls are eager, they're talented and we hope you will support them in their efforts!

We have all learned how to make these super fun hair accessories and our goal is to sell enough to sponsor a child to go to Pine Cove this year!
Girls in this generation LOVE to take pictures and have mini photo shoots with their friends right? Color blocking is popular right? Well we think our flower headbands are the perfect pop of color! These flower headbands also look adorable on babies and toddlers. Is the flower too much for your personal style? We are offering the plain headbands as well.


Flower headbands are $5 
Headbands with no flower are 2/$5 - includes 1 print/1 solid or 2 solid colors
   * All flowers are made with care, high quality felt, not craft felts and the bands have a hidden seam so you can wear your flower wherever you choose on your head and not have to hide a knot


   ** we hope to have turnaround time in about a week once an order is placed
Live far away? no problem, we can ship for $2 for your first item, Add 50 cents for additional items
Prefer to pay with paypal? We can send you an invoice, there will be a surcharge just to cover the fees
Contact us at girlsthatgive@gmail.com to order or with any questions!

***click on any picture if you'd like to see it enlarged


Choose from a variety of felt and elastic colors. Flower headbands are $5 
We know this time of year family photos on the beach are popular. The white flower headbands would be perfect!
If you prefer plain headbands with no flower, they are 2 for $5. You may pick one solid and one print or 2 solid colors. Ivory is available and shown on the girls in the first photos.
We can attach the flower to clips instead of headbands if you prefer.
Jazz up your favorite fedora hat giving it a feminine twist or even a military cap!


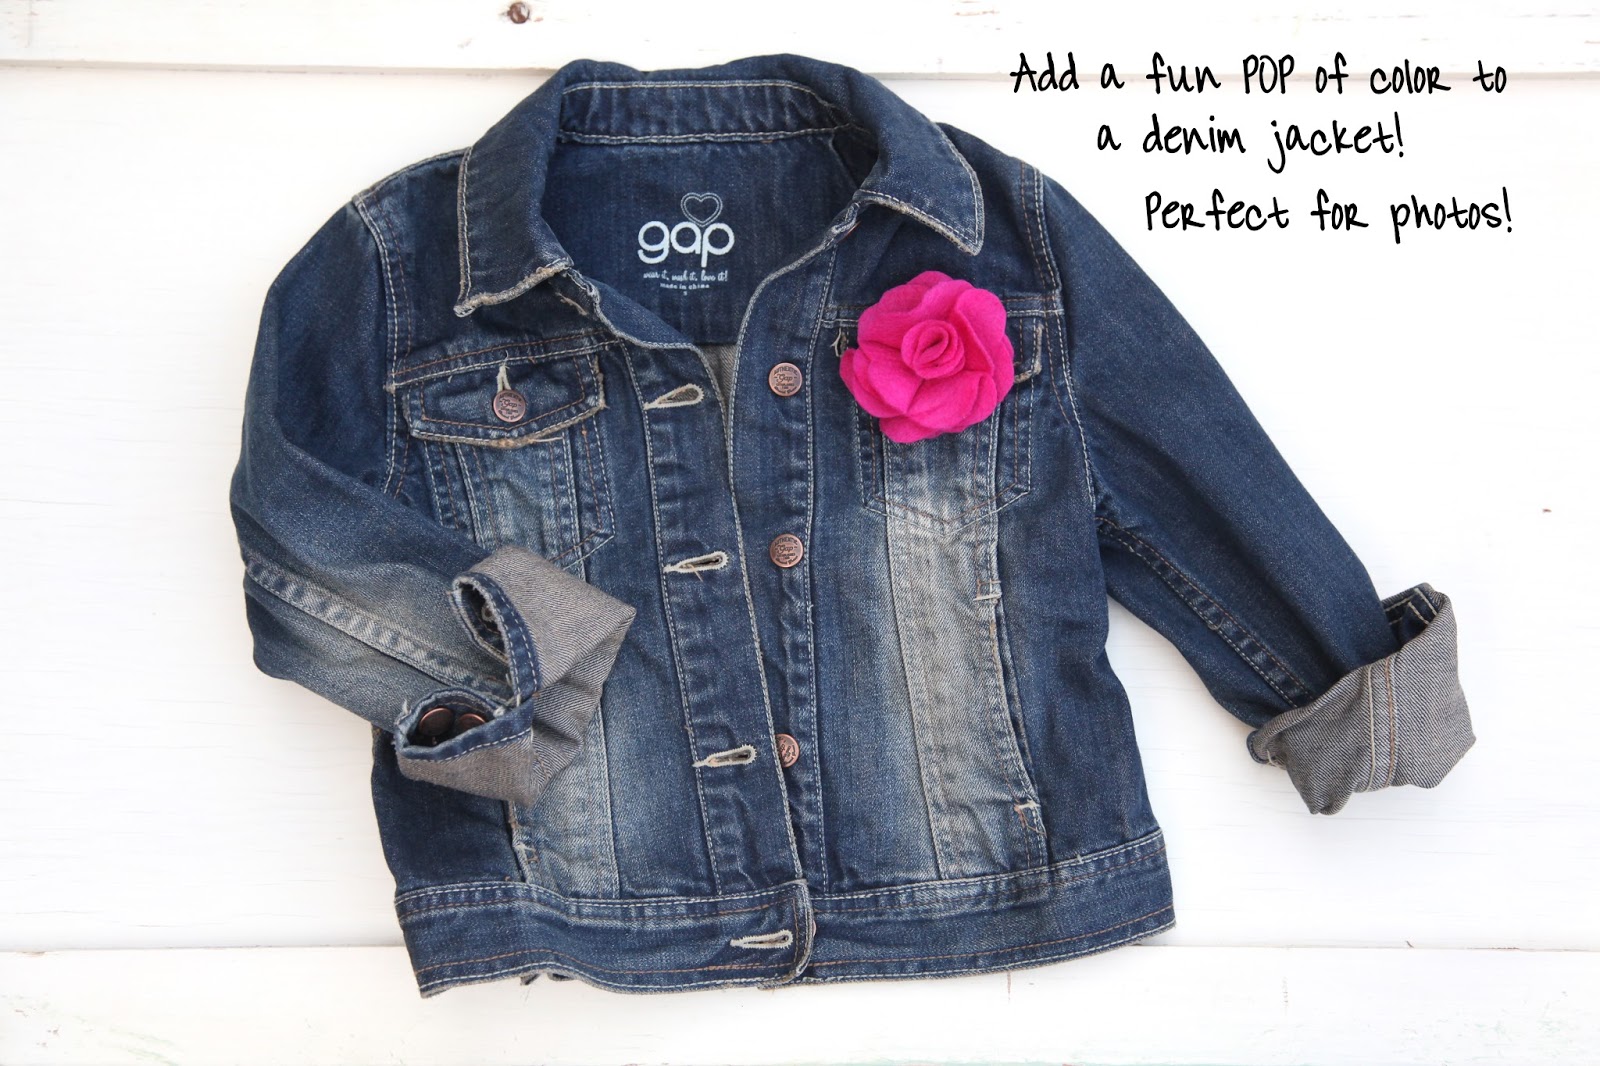
Denim jackets are so popular these days and how cute would it be with a touch of color. Taking family photos? I love a family photo where that one family member has that bright pop of color!


Spruce up any gift box or a gift bag with a flower!


Warning, these accessories may cause you to have excessive fun and jumping capabilities! 

If you made it this far, thank you for your support in helping us towards our goal of teaching our kids to think beyond themselves and see how they can make a difference in other peoples lives.

Friday, November 16, 2012

DIY Chevron Table Runner Tutorial

I love adding fabric to a room and to see how it can change the personality just by the pattern of the print or the colors in the fabric. Of course everyone is Chevron crazy these days. It's a great print that's a little bit more contemporary but can work in a home that could range from traditional to contemporary. I picked it up to try my hand at making a table runner for a girlfriend of mine who was having a birthday. She's got those Restoration Hardware colors going on in her house and I just hoped this might but something she'd like for one of her tables.

Click on any photo if you want to see it enlarged and read through before you start. I've included a few options at the end.


I started out with 3 yards of fabric. I like to have plenty on hand for cutting errors but if you don't like buying more than you need and hate waste, I'd suggest measuring your table and then add 1/2 a yard. For example, if you have a 6 foot table, ask them to cut you 2 1/2 yards.
I'm adding ruffles to either end of this runner so I also cut 2 5" pieces and then cut them 2x the width of what the final runner will be. I'm making this runner to be about 14" wide so I cut my ruffles 28" long.


I started by cutting my main long piece and cut it the length of the table + 10 inches because I wanted to have a little overhang on each end. This is just a preference of mine. I've seen table runners stop a foot short of either end of a table so cut the length however you prefer. 
Since this print has a very obvious pattern that you pick up on, I ended up cutting at the tip of one of the chevron points and that was easy for me to follow along across the width of the fabric. For time sake, I cut my piece 28 inches wide so that the underside will be the same as the topside. I'm going to fold mine over so that one side is already done. (I like keeping it simple) You may want to use a less expensive fabric for the bottom liner instead of your selected home dec print since you aren't going to see it but I just used my print on both sides.


Once it was cut, I folded it in half along the length, right sides together and just pressed a light seam creating the edge and then pinned all along the open long side. I didn't press it too hard because I'm going to flip it and didn't want to be fighting a seam wanting to go the other way when I turn it right side out.


Next I just stitched down that long side. Both short sides are still open at this point.


Here I've flipped the piece right side out and this is when I'm turning that iron up to full heat and steam mode and giving it a good press.


Moving onto the ruffles. I took those pieces and pressed seams upward along the bottom and then along the short side pieces.


I serged my edges then just stitched these edges down.


Face your runner right side up and pin this ruffled piece placing right sides and pinning first at each end. One step I haven't shown is creating this ruffled piece. I did it the easy way. I turned my machine's tension all the way up to a 10 and lengthened my stitch as much as I could to a 5. As you feed a piece through your machine you will see it start to gather. This didn't create a ruffle that was the perfect fit to my runner but that's fine. This piece was too big but we'll make it fit. I start by pinning each end piece to either edge. Find the middle of the ruffle and pin that down to the center of the runner and then just add 2 more pins by manually bunching the rest of the ruffle up and pinning down.


Stitch the ruffled piece down.


I like things serged so no messy edges are on display. **


For my final step, I pressed that serged edge up so that it created a nice tailored ruffle.


Once you are done, add it to your table, step back and admire! This is such an easy way to instantly change the look of your room by changing out one piece. If you look at my previous post when I painted these chairs, you'll see how my breakfast table normally looks. I have a neutral colored runner and this blue and white chevron really changes to feel of the room.

**So there are so many different ways you can create this same look. I happen to have a serger so I'm able to easily add a ruffle and serge off messy edges. If you don't, you can always press the short edges on either end of your long runner piece in and then nest that ruffle inside and attach it. You will have encased those raw edges. If you do that, add an extra inch when cutting your long piece at the beginning to account for pressing those edges in otherwise you'll take from the overhang.

It's also optional to line it on the backside. If you want to make this super easy, just cut this as a single layer of fabric and simply hem all the edges. Easy right? Happy Sewing!


Thursday, October 18, 2012

French Cane Chair re-do DONE!!!!

      Wow, did my ADD ever get me good on this project I had for my breakfast table area. I started with more enthusiasm than you could ever imagine when I first blogged about this project HERE. I mean I was hosting a brunch at my house and one never spends more time and money on decorating than the month prior to having a ton of ladies over right??? I'm guessing I'm not the only one who wants their place "just so" before their friends come over! Well, the end of April was my goal to finish, brunch with the gals in my neighborhood came and went and October was when I actually finished. Live and learn...must focus!

I have followed Miss Mustard Seed's blog for quite some time now. I contemplated forever trying my hand at doing some painting, but seemed to get more caught up in the planning than the actual doing part.

I found a project, got scared off from doing it so started the search for someone else that could help me. It was then I had the pleasure of finding and hiring Meghan to finish my first project. Meghan now owns and runs The Weathered Cottage. I got to meet her and her precious family before she had started out on her new journey here in Austin, TX running her Antiques and Vintage Decor store. Meghan is a true delight. She is as sweet as can be and has that old soul who has amazing taste and talent in her arena. If you've never met her, swing by her store. It's worth the trip plus she carries ALL of the amazing paints you could want and holds painting technique classes as well. Don't have the time or the desire??? She has all kinds of finished pieces as well.

I've always liked making things but in years past it's always been on my sewing machine as I had focused on children's clothing design. These gals, as well as many others, have inspired some of the DIY in me that I've started taking on as I look around my home. I took pictures all along the way and thought I'd share how these chairs that I bought off of Craigs List became some of my new favorite pieces in my home.

Click on any photo if you'd like to see it enlarged.


Well, here they are when I got them. A mismatched set, stained and yellowed cushions just from age but I was fine with that, I like the mismatched look and planned to reupholster. My husband's reaction? Those are hideous, why are they in our garage, who's grandmother did you steal those from and when do I get that garage space back? He failed to see my vision at stage 1 and wasn't impressed with my response that "They have good bones and the cane is intact."


When my husband saw those chairs, I actually think in his mind this was his fear! One day our garage might look like this because I have been known to haul home a few random pieces.


I was certain I wanted to keep the cane with the beautiful stained brown color. I was wanting the contrast on the chairs so thought it worth the extra step, (I mean pain in the rear) it took keeping that intact and only painting the frame. Taping around all these curved corners both front and back is a long process. Keep the end in mind....worth the time!!


Start by removing all the seat cushions and set them aside and cleaning your chair off. I just wiped the chair with a microfiber cloth so it was free of any dust and whatever so my surface was ready to be painted on.

Now, time to get your supplies and start painting! I'm using Annie Sloan Chalk Paint in Old Ochre. If you've never painted with this paint, trust me it's amazing!! No stripping, sanding, priming..just dive in and paint right onto your surface! It's worth the extra cost and Meghan carries all the colors at her store.
Here I've got my paint, some good paint brushes, painters tape and some fine grade sand blocks and another that is grittier.


Get some good music if you have a project like this. Oh and long blocks of time and of course cooler temps are better than Texas summer heat.


I did 2 coats of the paint on my chairs. I did a first coat to try and get basic coverage. I sanded it down with the finest sand block I could find. Going on my memory I think it was like a 320 grit. I definitely preferred the sanding blocks to paper. I think they are much easier to work with then a flat piece of sandpaper. All I was doing in the first coat was smoothing things down and evening out the surface if I had any drips. 

Next I painted over it again just getting good coverage so there wasn't any wood showing through. If you are frustrated with paintbrush strokes. Don't be afraid to add water to your paint to thin it out a bit. I found my paint was VERY thick and a little goes a long way. Since I had very tight carving details, it helped to have my paint a bit thinner so it didn't goop everywhere. Do what ever you prefer but if you feel it's going on very thick and you are left with more brush stroke lines than you like, just thin it out. Don't panic though, you'll sand away some of those brush strokes too.


Well, here's 3 of them after their 2nd coat. Time to sand more.


Just be ready, this is chalk paint after all. When you are sanding, be sure to be in an open area because this stuff will fly everywhere and you will be covered. I start by sanding all of the surfaces with my fine grain sand block just to get a nice even coat on the chair. After they felt nice and smooth, that's when I got my heavier grit sand block and then started my distressing. I just hit the edges and corners with a little more umpf til I started seeing the wood come through. This was a really fun process. I started to overthink it and was being too deliberate in how I sanded. I found in the end the best process was just going along the edges and having it be a bit more random. I preferred the look of it looking more worn in some places than others. It naturally happens as you will put more pressure in some areas and of course remove more paint over the span of your stroke. I could easily get carried away with the distressing. Go a little bit at a time, step back, walk around it and see how you like it as you progress through your piece.


When I was at Home Depot I did find this handy dandy micro-fibre duster. What a life saver! After every sanding you will be covered with chalk dust and your chair will be covered even more. This was an easy way to get to all those nooks and crannies and get that paint dust outta there.


Loving how they were coming along, this is the finished top to one of the chairs.


After you've done all the sanding you'll notice this surface really does have a chalky feel. Not everyone adds a wax coating but I'm glad I did. It really sealed everything in and made it feel nice and smooth. This is an easy step. Just get a clean rag, dip it into your wax and just lightly run it over the surface of all your chairs. It should be completely dry in under 30 minutes.

One thing I learned here, consider the COLOR of your wax. You can get dark, clear and in my case my wax was a yellow-ish color. Do a test spot before you commit to doing your entire piece to ensure it's what you like. When I was at the hardware store, I never realized I'd grabbed a wax that was yellow but since that was what I had on hand and it didn't change my chair color too much, I pressed on using it.  The yellow tint ended up warming up the pieces. It certainly didn't turn them yellow but the whiteness did tone down. In hindsight, I'd probably make certain to grab a clear wax so the color that goes on is the color that I end with.


Now to upholster those seat cushions. Decisions, decisions! Which side of my fabric??
I ended up going darker, I've got kids after all.


Remove your covers however you like. I just cut right through the top and ripped them off. Be careful not to dig your scissors straight into the foam cutting it. Those staples on the underside of the seat were in so dang tight, they weren't budging so I left them in and just cut the fabric.


Cut your fabric so you have some clearance on all sides and place your chair cushion down on it. Pay attention to the placement if you have a direction to your fabric like I do. I didn't want it wonky on the chair so was careful in lining it all up.


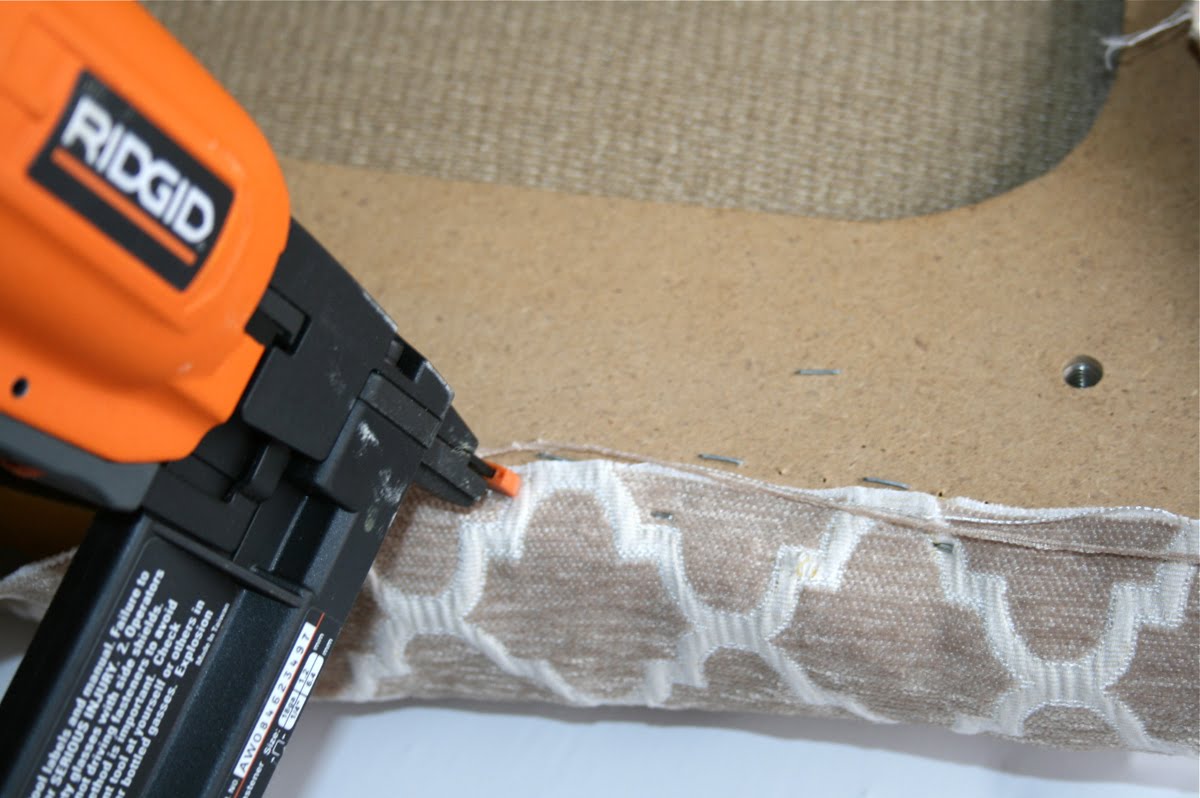
Next it's time for tools! Just staple gun all the way around. I used one attached to an air compressor, wow did that thing have some power and made this job much easier!

 Do the 4 sides first. Pull your fabric firmly but not so firmly you pucker the foam cushion down causing a dent. You want your fabric to be taut. Finish them off by folding the corners down. This is a tricky part. Do you best not to leave folds/creases in the fabric on the top side of the fabric but hide them on the underside where you staple away. It just looks more professional not seeing all those folds on the top side of the cushion. You do have to play with it a while but worth that time and effort.


Well, here is my first chair cushion finished and reattached back to the chair. Happy moment! 


Remember I had a mismatched set, here's one of each.


When we first moved into our house, here's what my breakfast area looked like. My table was small because of the tiny space we had in our old kitchen when we lived on the East Coast. Now we're in Texas and the space we have is much larger. 


I eventually talked the hubs into letting me get this pedestal table and it's from their Cambria Collection I'd been eyeing for awhile and continued to use my old black chairs. After chair shopping, who knew chairs were so expensive. That's when I started my Craigs List search. 


Ta-Da! Here's my breakfast room today. I love that it's gone from the heavier blacks/reds that I used to decorate with to a much brighter and lighter room. 

So this project did span 6 months! Should've taken less than a week. I didn't have them done for my brunch, not even when I hosted my ladies bible study, but they're done for the most important people under my roof, my family! All the time and effort that went into it was well worth it. I sure hope maybe this inspires someone else to try a new project. I am by NO means an experienced painter. I started this with little clue other than reading on the internet what and how to do it and the will to attempt. It was so much fun and I encourage anyone who's got the urge to give it a whirl.


So the next time you are cruising Craigs List or even a garage sale, don't move so quickly you miss some real beauties that just need a little updating. My husband thought I was nuts when I brought these home and now we love our eating space.