Thursday, October 18, 2012

French Cane Chair re-do DONE!!!!

      Wow, did my ADD ever get me good on this project I had for my breakfast table area. I started with more enthusiasm than you could ever imagine when I first blogged about this project HERE. I mean I was hosting a brunch at my house and one never spends more time and money on decorating than the month prior to having a ton of ladies over right??? I'm guessing I'm not the only one who wants their place "just so" before their friends come over! Well, the end of April was my goal to finish, brunch with the gals in my neighborhood came and went and October was when I actually finished. Live and learn...must focus!

I have followed Miss Mustard Seed's blog for quite some time now. I contemplated forever trying my hand at doing some painting, but seemed to get more caught up in the planning than the actual doing part.

I found a project, got scared off from doing it so started the search for someone else that could help me. It was then I had the pleasure of finding and hiring Meghan to finish my first project. Meghan now owns and runs The Weathered Cottage. I got to meet her and her precious family before she had started out on her new journey here in Austin, TX running her Antiques and Vintage Decor store. Meghan is a true delight. She is as sweet as can be and has that old soul who has amazing taste and talent in her arena. If you've never met her, swing by her store. It's worth the trip plus she carries ALL of the amazing paints you could want and holds painting technique classes as well. Don't have the time or the desire??? She has all kinds of finished pieces as well.

I've always liked making things but in years past it's always been on my sewing machine as I had focused on children's clothing design. These gals, as well as many others, have inspired some of the DIY in me that I've started taking on as I look around my home. I took pictures all along the way and thought I'd share how these chairs that I bought off of Craigs List became some of my new favorite pieces in my home.

Click on any photo if you'd like to see it enlarged.


Well, here they are when I got them. A mismatched set, stained and yellowed cushions just from age but I was fine with that, I like the mismatched look and planned to reupholster. My husband's reaction? Those are hideous, why are they in our garage, who's grandmother did you steal those from and when do I get that garage space back? He failed to see my vision at stage 1 and wasn't impressed with my response that "They have good bones and the cane is intact."


When my husband saw those chairs, I actually think in his mind this was his fear! One day our garage might look like this because I have been known to haul home a few random pieces.


I was certain I wanted to keep the cane with the beautiful stained brown color. I was wanting the contrast on the chairs so thought it worth the extra step, (I mean pain in the rear) it took keeping that intact and only painting the frame. Taping around all these curved corners both front and back is a long process. Keep the end in mind....worth the time!!


Start by removing all the seat cushions and set them aside and cleaning your chair off. I just wiped the chair with a microfiber cloth so it was free of any dust and whatever so my surface was ready to be painted on.

Now, time to get your supplies and start painting! I'm using Annie Sloan Chalk Paint in Old Ochre. If you've never painted with this paint, trust me it's amazing!! No stripping, sanding, priming..just dive in and paint right onto your surface! It's worth the extra cost and Meghan carries all the colors at her store.
Here I've got my paint, some good paint brushes, painters tape and some fine grade sand blocks and another that is grittier.


Get some good music if you have a project like this. Oh and long blocks of time and of course cooler temps are better than Texas summer heat.


I did 2 coats of the paint on my chairs. I did a first coat to try and get basic coverage. I sanded it down with the finest sand block I could find. Going on my memory I think it was like a 320 grit. I definitely preferred the sanding blocks to paper. I think they are much easier to work with then a flat piece of sandpaper. All I was doing in the first coat was smoothing things down and evening out the surface if I had any drips. 

Next I painted over it again just getting good coverage so there wasn't any wood showing through. If you are frustrated with paintbrush strokes. Don't be afraid to add water to your paint to thin it out a bit. I found my paint was VERY thick and a little goes a long way. Since I had very tight carving details, it helped to have my paint a bit thinner so it didn't goop everywhere. Do what ever you prefer but if you feel it's going on very thick and you are left with more brush stroke lines than you like, just thin it out. Don't panic though, you'll sand away some of those brush strokes too.


Well, here's 3 of them after their 2nd coat. Time to sand more.


Just be ready, this is chalk paint after all. When you are sanding, be sure to be in an open area because this stuff will fly everywhere and you will be covered. I start by sanding all of the surfaces with my fine grain sand block just to get a nice even coat on the chair. After they felt nice and smooth, that's when I got my heavier grit sand block and then started my distressing. I just hit the edges and corners with a little more umpf til I started seeing the wood come through. This was a really fun process. I started to overthink it and was being too deliberate in how I sanded. I found in the end the best process was just going along the edges and having it be a bit more random. I preferred the look of it looking more worn in some places than others. It naturally happens as you will put more pressure in some areas and of course remove more paint over the span of your stroke. I could easily get carried away with the distressing. Go a little bit at a time, step back, walk around it and see how you like it as you progress through your piece.


When I was at Home Depot I did find this handy dandy micro-fibre duster. What a life saver! After every sanding you will be covered with chalk dust and your chair will be covered even more. This was an easy way to get to all those nooks and crannies and get that paint dust outta there.


Loving how they were coming along, this is the finished top to one of the chairs.


After you've done all the sanding you'll notice this surface really does have a chalky feel. Not everyone adds a wax coating but I'm glad I did. It really sealed everything in and made it feel nice and smooth. This is an easy step. Just get a clean rag, dip it into your wax and just lightly run it over the surface of all your chairs. It should be completely dry in under 30 minutes.

One thing I learned here, consider the COLOR of your wax. You can get dark, clear and in my case my wax was a yellow-ish color. Do a test spot before you commit to doing your entire piece to ensure it's what you like. When I was at the hardware store, I never realized I'd grabbed a wax that was yellow but since that was what I had on hand and it didn't change my chair color too much, I pressed on using it.  The yellow tint ended up warming up the pieces. It certainly didn't turn them yellow but the whiteness did tone down. In hindsight, I'd probably make certain to grab a clear wax so the color that goes on is the color that I end with.


Now to upholster those seat cushions. Decisions, decisions! Which side of my fabric??
I ended up going darker, I've got kids after all.


Remove your covers however you like. I just cut right through the top and ripped them off. Be careful not to dig your scissors straight into the foam cutting it. Those staples on the underside of the seat were in so dang tight, they weren't budging so I left them in and just cut the fabric.


Cut your fabric so you have some clearance on all sides and place your chair cushion down on it. Pay attention to the placement if you have a direction to your fabric like I do. I didn't want it wonky on the chair so was careful in lining it all up.
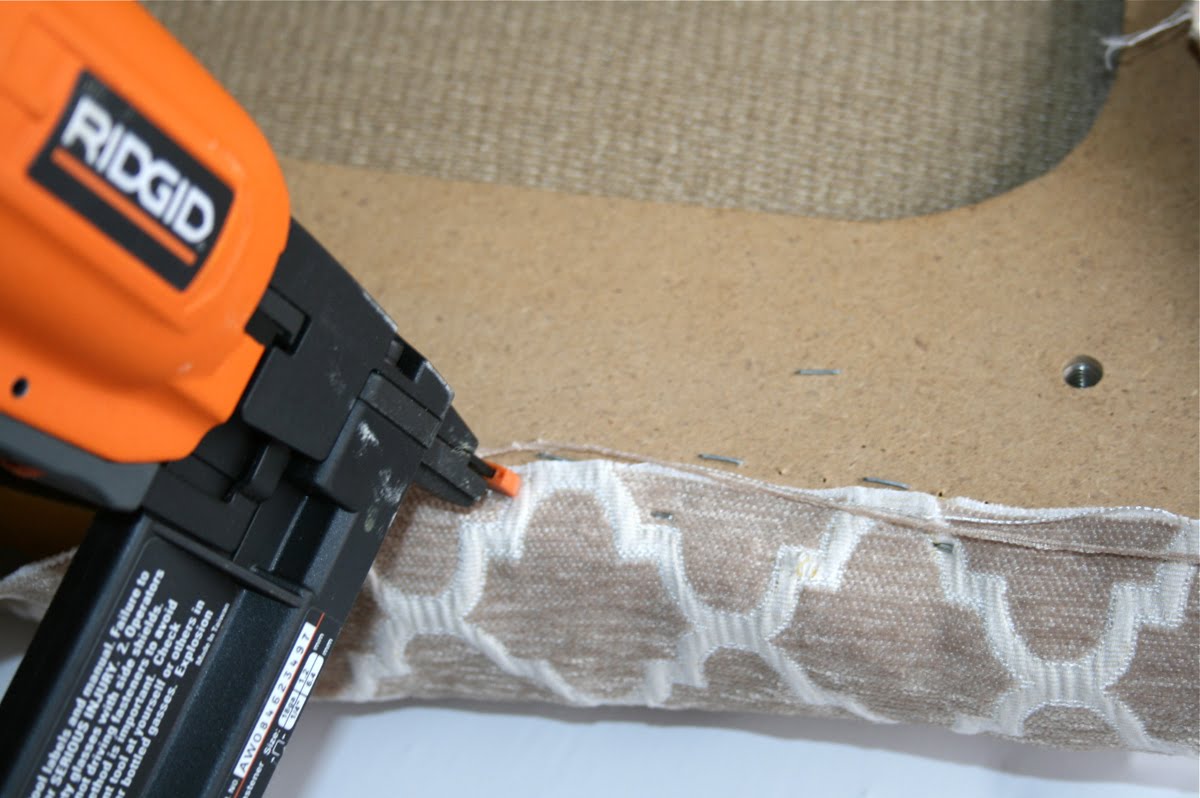

Next it's time for tools! Just staple gun all the way around. I used one attached to an air compressor, wow did that thing have some power and made this job much easier!

 Do the 4 sides first. Pull your fabric firmly but not so firmly you pucker the foam cushion down causing a dent. You want your fabric to be taut. Finish them off by folding the corners down. This is a tricky part. Do you best not to leave folds/creases in the fabric on the top side of the fabric but hide them on the underside where you staple away. It just looks more professional not seeing all those folds on the top side of the cushion. You do have to play with it a while but worth that time and effort.


Well, here is my first chair cushion finished and reattached back to the chair. Happy moment! 


Remember I had a mismatched set, here's one of each.


When we first moved into our house, here's what my breakfast area looked like. My table was small because of the tiny space we had in our old kitchen when we lived on the East Coast. Now we're in Texas and the space we have is much larger. 


I eventually talked the hubs into letting me get this pedestal table and it's from their Cambria Collection I'd been eyeing for awhile and continued to use my old black chairs. After chair shopping, who knew chairs were so expensive. That's when I started my Craigs List search. 


Ta-Da! Here's my breakfast room today. I love that it's gone from the heavier blacks/reds that I used to decorate with to a much brighter and lighter room. 

So this project did span 6 months! Should've taken less than a week. I didn't have them done for my brunch, not even when I hosted my ladies bible study, but they're done for the most important people under my roof, my family! All the time and effort that went into it was well worth it. I sure hope maybe this inspires someone else to try a new project. I am by NO means an experienced painter. I started this with little clue other than reading on the internet what and how to do it and the will to attempt. It was so much fun and I encourage anyone who's got the urge to give it a whirl.


So the next time you are cruising Craigs List or even a garage sale, don't move so quickly you miss some real beauties that just need a little updating. My husband thought I was nuts when I brought these home and now we love our eating space.


Tuesday, October 16, 2012

Big Sale Price Drops on ebook Patterns .... get stitching!

If you've been thinking about trying your hand at sewing, then this is the season to try. Cold weather always brings me back to my sewing room. It naturally carves out time where I can create. If you are intimidated by store patterns, (me too) that claim to be easy but leave you scratching your head in wonder, then an ebook is perfect for you. My patterns include step by step instructions that won't leave you hanging and are complete with full color photographs to illustrate each step. It's almost like having a person sitting right there with you.
All prices on patterns have dropped across the board and are found in my online store. If you have a few you'd like, grab the bundled packages that include a further discount. No need to be bored through the cooler months. Learn something new and feel the thrill of DIY! Many of these patterns look like they're designed for Spring/Summer because of how they're photographed, but simple changes let you create for Fall/Winter. Layer pieces, make your colorblock dress starting with a long-sleeve tee. You get the idea...no go sew something!


Tuesday, July 31, 2012

Taking a much needed break!

It's just the ebb and flow of life. What am I referring to? I've been dancing around this feeling for the last year. Have felt that constant battle of time for work and time for family. Well, I've officially entered the season of life where I just need to take a break....actually I've been taking one for the entire Summer. Since the kids are home it seemed a perfect time!

Our days for the early part of Summer were filled with Swim Team. Hours on end at the pool every day for each kids different practice, long meets on the weekends and hours spent I'd never ever trade!

Gotta love a powerful camera that can capture a still image like this and actually make the water look like it's thick clear sludge.
A great dive by my 6 year old is always sure to make Mama smile!
Yes, I'm also glued to the Olympics watching swimming and all the other amazing athletes! Team Lochte or Team Phelps? Hmmm, we are a house divided on who our fave is.

Long story short. The past 6 years have been just amazing as I've marveled and feel so incredibly blessed at how my business has grown out of my love for children's design. When anybody asks me how this all started, I smile and respond, "by accident" I went to college and got a business degree and sold computers for 10 years, I didn't attend design school! Kids started to come along and my husband bought me my first machine and naptime became my creative time to play around.

My first 2 children were girls and I naturally had an appetite for fun and expensive clothing for them. My closet wants for them outweighed what I should spend (surely this feels familiar to others) so I started creating. As I clothed them 1 design at a time, I had 2 little advertisers walking around. People would stop me and ask me about their clothes. Did I mention when I started to sew, I was in cold Chicago? This was a perfect hobby to take up for the long Winter months. I would create way more than any child could possibly wear and before I knew it La*tee*da*kids was born. What has happened over the years is the shift in balance. Work started sneaking into parts of the day and night that I really need to give back to my family or just taking time for myself. Truthfully the hardest part of this job is recognizing where to say no and consciously choosing your family and what's best for them over the ego of wanting to create and sell more. I won't get these years back with my kids so things just need to slow. All designers hit those creative plateaus and I'm there by all accounts. A brain rest is 100% in order! Just need to hit that refresh button!

Am I hanging up my hat? Nope, it's in my blood. I am going to slow things down, take more time for my family, for the curtains that I've still not done for my own bedroom 5 years after moving into our home! I have countless projects piling up that I'd love to complete and plenty of new things to try....thank you Pinterest

I plan to keep up with the blog and sharing the things we are doing around the house and new DIY projects and crafts that we have our hands in. We recently made THESE, OMG, so much fun! My kids were so thrilled with their knockoff "Ugly Dolls" Sure hope that readers and facebook fans stick around! New designs will probably hit for the Holiday season. I always feel inspired as we inch towards Holiday releases and by then I hope to feel that creative burst once again!

Hope everyone has had a fun filled summer with family and friends! Enjoy these last few weeks!

Tuesday, July 17, 2012

Clean Eating Pan Seared Tilapia Fish Tacos

I must start eating better! We all say that to ourselves at one point or another right? I consider myself a pretty good eater but just like anyone else, the older I get, the better I need to be. My girlfriend sent me this link so I could calculate how many calories I should take in a day based on my age and activity level and what weight I'd like to maintain. I exercise pretty regularly and it still only gave me 1500 calories a day. Really??? Actually it gave me 1477 but I'm a girl who likes round #'s. Okay, I'll try.

My biggest challenge is that my hubby is on the road a few days a week each week and those end up being cheat days on top of my weekend cheat days because I graze on kid style food. My kids don't appreciate meals that have lots of fresh ingredients and they certainly aren't impressed that it's a clean eating meal! They are pretty simplistic and are satisfied with a cheese quesadilla and some fresh fruit or something along those lines. I on the other hand crave texture, lots of spice, don't like to spend a ton of time in the kitchen and hate excessive waste which happens when you are cooking for 1 adult. The dinner I've been making lately is easy to make for one person, packed with flavor, texture and satisfying. Best part, light on calories!!! Have you ever tried fish tacos? Well you should...read on! Delicious and so quick to put together. This recipe is made for 1 but just adjust as needed.

Pan Seared Tilapia Fish Tacos

■ 6 oz Tilapia filet (this is a single person serving, adjust accordingly)

■ Old Bay Seasoning

■ 2 corn tortillas

■ 1 small avocado

■ 1 Tablespoon Slow Burn creamy jalapeno dip (photo'd below)

■ Angel Hair coleslaw

■ Pico de Gallo

■ Salsa (optional)

■ 1 lime

■ diced cilantro (optional)

Season each side of your filet with the Old Bay Seasoning. Heat some olive oil in a pan and then sear on each side for about 2 1/2- 3 1/2 minutes on each side depending on how thick your filet is. It will be white and flake easily when done.

Above is the creamy Jalapeno slow burn sauce we use. You can hunt your own local grocery stores and probably find something similar.

As you are cooking the fish, prep your other items. Slice you avocado into slivers so they're ready to go. Cut your lime into quarters.

Heat 2 corn tortillas so they are warm. Take your cooked fish, divide into 2 equal parts onto the tortillas and then just start layering on your goodies. I usually layer fish first and then the cole slaw. Drizzle half the creamy sauce onto each taco so it's all through the coleslaw. Top with the pico de gallo and then salsa if you like. I prefer the chunks of the pico de gallo so that's usually all I use but my husband likes lots of fresh salsa added to his as well. Add a healthy slice of avocado, squeeze some lime juice over your taco for a nice citrusy flavor and finish off with some diced cilantro as an option. Enjoy!

I've tallied the calories on this and am happy to report, if you stick to using the corn tortillas that are 110 calories for 2 tortillas and you pan sear, NOT FRY, your fish, you will come in at about 200 calories a taco....and yes, that includes avocado.

Tuesday, May 29, 2012

Simple Project - Decorating with BOOKS

I love flipping through magazines and seeing well styled bookcases. It all looks so simple but never seems to be the easiest task to pull off. I'm constantly placing things, stepping back, moving things around and doing even the slightest shift of an item in hopes of landing on something I'm 100% pleased with. One thing I know I love to see are books. Books that are leaning, books that are stacked, old books, decorating books and in this case, placed in the shelf bundled and backwards.


I love grabbing old books at market trade days, half price books etc but sometimes the books themselves don't always have the spines that I want showing but that doesn't need to slow you down.


Check out this bundle of 4 books. Simple, simple, simple! Anyone out there believe at one time they were going to be a scrapbooker and collect all kinds of supplies? me too! I had a friend who sold the Stampin' Up products and I have all kinds of alphabets. Lower case, upper case and a variety of fonts and now I'm feeling good about the fact that they've been used more than when my girls were little and learning letters. All that we've done to these books is simply get some black ink and stamp on them. Use whatever word you like. Love, Hope, Pray. You get the idea! Don't pay too much attention to getting the letters at the exact same height. I actually think having them a bit off adds to the character. This bundle is bound in a ribbon with an added cross charm. Sweet isn't it?


For the prettier books, like the ones above, I love seeing them wrapped in burlap ribbon. If you like this look as well, you can find all kinds of widths of the ribbon HERE and other great supplies at fantastic prices. Burlap just has this way of making everything, even your books, extra pretty.

Sunday, May 13, 2012

Twirl Ruffle Skirt Tutorial .... go ahead and DIY!

It's almost Summer!!! Time for vacations, trips to the pool and sleeping in! Yay for sleeping in. My soon to be teenager is all over that one. It's also time for fun summer skirts!!
2 of my favorite little girls are heading to Disney World this weekend. I couldn't let them leave without sending them with something fun to wear and while I made these for them, I went ahead and created a tutorial for this fun little skirt.
Click on any photo if you'd like to see it enlarged


My skirt is of course Minnie Mouse inspired with the giant red polka dots. Choose whatever fabric you like, use something different for the ruffle if it makes you happy having some contrast! Now follow along while I show you how to make this skirt that is perfect for the beginning sewer.
**Please keep in mind. There is more than one way to skin a cat! This is how I made this and came up with my own measurements. You can always use your own methods. **
***All seams are sewn with a 1/4" seam allowance***


First off gather your suppies. This is actually going to be a 2 part tutorial as I made applique tanks as well and you'll have to stay tuned for that post. For your skirt, all that you need is
1. Fabric of choice - Grab about 1/2 - 3/4 of a yard if you are just doing a single print. This depends on the size you are making. Anything size 5 and down should be good with 1/2 yard but follow the calculation shown below on the length you want to end up with and then determine your fabric needs. If your preference is to have them run a little longer, use my calculation to figure out what you'll need.
2. 3/4" no roll elastic    
3. thread and then of course your scissors, sewing machine etc


For this skirt, I am making a sz 4. First I cut a piece on the fold that was 11". 
Next cut 2 strips that are 2.75" and these will be your ruffle. If you don't have a serger and want the edges finished, you can cut your ruffle pieces 1/4" more. Read ahead where we are doing the ruffles to see further explanation.
I know the questions that tend to come next. I'm making a size 6, what do I cut for that?
Well, how long do you want it to be? Your total length will be approximately the sum of your cuts - 2.25 if you maintain a 1/4" seam allowance when sewing. In this case 11 + 2.75 - 2.25. That will make a finished skirt approximately 11 1/2" long. Use that formula to determine what you need to cut for the size or length you want.


Take your first large piece, trim off the selvage which is the white strip down the side that indicates fabric name etc. 
Next, cut your long rectangle down the middle so you now have 2 pieces, exact same dimensions 2 rectangles that are approximately 11" * 21ish" wide. Lay those 2 pieces on top of each other, fold them in half like shown above. Using a quilters ruler like I am using above or just eyeball it and cut an angle. If your print has a direction, (i.e. flowers, animals etc that need to be upright, make sure your fabric is facing upwards before you cut.) The narrower side is the top where your elastic waist will be. 
I am cutting this to be slightly A-Line so that it'll flare better with less bulk at the waist. There isn't an exact right or wrong way to angle it in. I cut mine so the ruler was about 2 inches over at the top. This is easier understood by enlarging and looking at the picture than to follow words here promise!


Now open up those 2 pieces, place them right sides together and stitch down both short sides. Serge if you have one or zig zag to prevent fraying. 
***I sew everything with 1/4" seam allowance. Makes it easy for me because it's the distance from the needle to the edge of your presser foot and makes for a simple guide****


Next we will make the casing for the elastic. Flip the top of your tube (more narrow end is the top) down 1 1/2" and press with your iron. 


Then fold in your casing about 1/4" and press again. Move around your skirt just a little at a time. Pressing this well makes it so much easier. I've tried to show this above how on the far right side that is the original 1 1/2" that you've pressed down and near the iron you can see where I've started to fold that raw edge under and press down. All we are doing here is encasing our raw edge so it looks pretty and finished on the inside.


Head to your machine and stitch your elastic casing all the way around by edgestitching. This is just stitching close the edge :) Leave about a 2 inch opening so we can add the elastic in later.


Now let's make our ruffles. Stitch your 2 long pieces together at 1 of the short sides creating one long piece.
Press a 1/4" hem upwards all along the bottom edge. My fabric doesn't have a direction but again, if yours does, make sure it's facing the right way. This edge is the bottom of your ruffle.
Next I am going to serge the edge to prevent fraying. If you don't have a serger you can always turn this another 1/4" and then the raw edge will be completely enclosed. Your call here on what you prefer.


Here I am serging the edge just so it's finished on the inside.


Stitch the other short side together so you have one gigantic loop. Now turn that edge you pressed earlier up and stitch it all the way around creating the finished hemline to your ruffle.


Now you need to ruffle the fabric. I've done this a super easy method. I have changed 2 settings on my machine and nothing else. I have lengthened my stitch to the longest possible, (you can see on my screen it is a 5) and then have changed my tension dial to the highest setting which is 10. My dial here is on the top of my machine. Once you have done this you can put your piece of fabric on the machine and stitch all the way around on the side that is your raw edge. Your fabric should ruffle as you go. If you need help on sewing ruffles, there are several other methods you can try as well. Click HERE for more help.
When you are done, don't forget to return your settings back to normal tension and norman stitch length!


With right sides together, pin your ruffle to the bottom side of your skirt. My ruffle strip is much bigger in diameter than my skirt. This is FINE! Match up the 2 side seams of the ruffle to the side seams of the skirt. Pin at those 2 halfway points. Then I pin at the other halfway points so at that point my skirt is pinned into 4 quadrants. Then I just pin and eyeball as I go. These don't need to look perfect and that's what I think looks better about ruffles done like this. They don't have the look of perfectly uniform pleats.


Once your entire ruffle is pinned on it should look like this. Stitch it on. Again, don't panic since your ruffle piece is bigger than your skirt. As you feed it through the machine to stitch the ruffle on, just manually scrunch up the extra as you go feeding it under the presser foot and stitching it on.
 I tend to sew right over my pins but I know lots of people get nervous about that and yep, I've had many snap in half. If it makes you nervous, as you come up on to those pins, pull them out before they feed through the presser foot.


Once my ruffle is stitched on, Press that interior seam upwards.


Now turn it over and on the right side of the fabric top stitch the ruffle. This is a stitch on top of the fabric just above the seam giving it a more finished look. Not a mandatory step. I just prefer the look of a topstitched piece.


Now we need to add in your elastic. Cut your piece to fit your child and feed through with a safety pin and stitch this together. Once the elastic is in, close up that opening.
** I usually cut my elastic about 2-3 inches less than their waist measurement.


Voila you are done and she is ready to put it on!


Check back next week if you've ever wanted to learn to applique. This skirt went hand in hand with this tank and I'm writing instructions how to do applique tee's as well.