Friday, March 30, 2012

No Bake Energy Bites ... by the kids!


I get this question a lot! Mom, can we make something? Since they are referring to cooking and not crafting, my practical self has that voice inside me going....."I know there is going to be a mess left for yours truly to clean up even when there is the promise to clean it all up themselves."

My reply? "Umm, what are y'all wanting to make" Those energy bites we had once! I'm thinking, well I sort of like having a stash of those on hand anyways so we'll see how this goes. Since it requires no actual cooking, only assembly, I figure go for it.

I first sampled these little yummies at a Pinterest Party I had at my house. We all brought a dish we had pinned and had wanted to try and then we did a pinned craft project as well. Lots of fun and it's a great way to sample all the things we pin! If you've never had one, schedule one with your girlfriends. I give you this promise, you'll have a great time!


So this recipe is originally on this great blog Smashed Peas and Carrots and I've copied it below. You've got a little flexibility in the recipe if you want a flavor upped a bit or maybe taken down a notch. My kids of course want lots of chocolate chips but I try to stay conservative on those. Got another ingredient you want in there? raisins? dried cranberries? Shift things around as you like!

No-Bake Energy Bites
(makes 18-20 bites)

1 cup oatmeal
1/2 cup peanut butter (or other nut butter)
1/3 cup honey
1 cup coconut flakes
1/2 cup ground flaxseed
1/2 cup mini chocolate chips
1 tsp vanilla

Mix everything above in a medium bowl until thoroughly mixed.
Let chill in the refrigerator for half an hour. Once chilled, roll into balls and enjoy!
Store in an airtight container and keep refrigerated for up to 1 week.


It really is as easy as just dumping in a bowl. Maybe the biggest stumbling block my girls came across was getting everything like the peanut butter and honey out of the measuring cups. This was probably the only part I got involved in so they could learn the purpose of the spatula!


They are ready to go and decided to skip chilling this bowl for the half hour....patience not one of our household good qualities!


Here they go making their balls. Mishapen, different sizes, every single one looks different but they still all taste delish.


They discovered the downside of skipping the "chill your mix for half an hour" part of the directions. Sticky messy hands!


Well there ya have it. No doctoring to their work has been done. Here's our gorgeous platter of snacks all shapes and sizes and I have to tell you, every family member loves them. If you love girl scout Carmel Delights, you'll love these. Give them a try, or if you choose, let your kids loose in the kitchen! These are perfect for after school snacks and we've even put them in their lunches.

Sunday, March 25, 2012

I want wavy Beach Curls in my hair

This past weekend, my 2 girls had a weekend they look forward to every year. The annual Daddy/Daughter dance! Heck I look forward to this weekend since it's a ball getting them gussied up for their #1 guy. They love heading out shopping, picking something to wear and keeping it secret til the big reveal the night of the dance. It's such a sweet thing seeing all the pretty young ladies heading off for the evening.

This year they got very specific on how they wanted their hair and I know it's all thanks to Pinterest! They've searched all kinds of things you'd expect any pre-teen to check out. My oldest has been teaching herself to french braid and any help from me was not welcomed. She was going it alone with her hair. My younger daughter on the other hand announced she wanted beach curls like THESE that she'd seen on my Pinterest board.


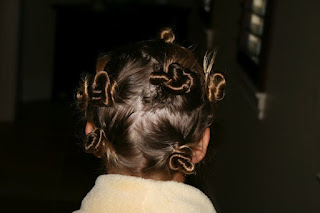
Here is her normal hair, it dries VERY straight and it's thin and fine so I had low hopes of getting volume and waves but figured we'd give it a shot and wanted to share our results. Click on any photo to see it enlarged.


First we showered and blew her hair dry to where it was still semi-damp. Then I just sectioned off her hair. I'd suggest dividing up her hair however you like. I think we had 7 or 8 sections. Take each section of hair and twist it as much as you can and twist in the direction you want the curls to go. I wanted them to curl towards her face so we twisted that direction. It really only matters for those first 2 sections on either side of their eyes.


You can twist the other sections either direction. Keep twisting until the hair is tight and starts to coil up then wind it up in a tight bun and pin in place with a bobby pin.


After you've done the entire head we sprayed some hairspray lightly all over the head and then hairdry the hair til it's completely dry. We put another light spray of hairspray on the hair, waited just a bit and then took out all of the buns. DON'T BRUSH! We just flipped our head over and back loosening up the curls and lightly finger combing the curls.


My daughter who has very straight and fine hair was so happy with her new beach curls that we were able to do in about 20 minutes and required no curling iron or rollers to fry her hair!


We added a few bobby pins to pull back off her face and then added some more hairspray. Never enough spray to make you think flammable 80's hair but enough to help keep them in place.


And there ya have it, one happy girl ready for the night and they were still there when she came home!

Friday, March 23, 2012

Handmade from the heart


I love ALL things handmade from the Heart

Yes, I absolutely love it all! I'm also guilty of throwing away a LOT of artwork that has come home. We've probably all been through the experience of our kids heartbroken faces when they found something of theirs in the garbage and then start a routine check of what you are tossing! Over the years we all know it's just impossible to keep each and every drawing, trinket, pottery pinch pot, paper airplane or whatever item has been brought home. Each of my kiddos has a big rubbermaid bin to store all of their favorite creations. Over the course of the years, we've stashed favorite art projects, journals they've written in and a huge variety of things they've made through the years. I know these will be precious memories for me when they are grown and gone.

Earlier this week I wore a very special necklace my son made for me when he was 4 for a Christmas present. (Sorry about the crummy pic, I just grabbed it sitting here at my desk on the webcam :) I just love it and every now and then pull it out to wear. He loves that and when I wear it, he likes to recall the story of when he made it. "Mommy, do you remember when I made that for you and I told you I was making it for someone very special but wouldn't tell you who?" Well of course I do, I may be getting older, the brain is getting foggier but certain memories like this are ones I hold onto dearly! I loved watching you lay out your pattern selecting the perfect colors and then watching you wrap it all while telling me it was a secret who it was for but that she was special. My younger daughter made me a splatter paint patterned duct tape bow yesterday. Hhhhmmm, I guess I'm going to need to wear that one day soon too. What have your kids made you that melts your heart whenever you see it? I love the ones they dream up and then I love spending an afternoon with them crafting and spending time together. Next up? Ugly Dolls!! My kids love these little stuffed fleece monster dolls and I see no reason why we can't make our own. Stay tuned to a later blog post on how those turn out.

Wednesday, March 21, 2012

Twins...Double the FUN

I love hearing from you! I love getting your emails, your photos and always enjoy special requests. Not too long ago I got an email from the mom of twins. She loves to match them but likes to give them a bit of their own personality by changing things up a little for each girl. I totally get that and I like her approach.

My own girls are only 18 months apart and when they were little I matched them all the time. It wasn't so much a matter of matching, but more a matter of liking something and then just buying 2 and then they tended to wear them at the same time. It sort of made life easy getting them dressed. The funny part was how many times I'd get asked if they were twins. Really?? that made me chuckle! They don't look like twins, are built entirely different and there was an obvious difference in their growth because of their age gap. Still, it never stopped the inquiries. Eventually I decided I needed to give them their own personalities, play up to their preferences and colors they liked and stop dressing them in matching uniforms!


For the sweet mom that emailed me, here is what we came up with. She liked the color combinations on the Makena Dress (shown below) and asked if I had anything that could be created to go along with it. It just so happened I had the exact fabrics in different colorways on hand. You know this girl loves fabric so I tend to have lots of options on hand! I have to say, I'm loving the change up and think these little 2 year old cuties are going to look adorable! I had to grab a photo to share before we mail them off today. Today I decided to hang them from my new shabby ladder. This is one of the gems I grabbed during my trip to Fredericksburg. It's currently in my house just making a wall look pretty but I have a feeling it might show up in more photos. The perfect little prop to hang things from.


So if you have an idea in your head of a twist on a design that I've currently got, ask away, I invite the requests!

Tuesday, March 20, 2012

New Twirl Skirt in the Cowgirl Lineup

If there is one thing I can't seem to get out of my system, it's got to be my cowgirl inspired pieces. Often times I think I'm done finding fabrics that work in a new twist of colors and pattern and then new fabrics just start to jump out to me begging to be paired with the pony print! Must be because at my core, I know I'm a country girl. Anyone who follows me on Pinterest probably already knows that!

This current piece, that is in my Etsy store, was even more fun to do because it involved a collaboration. Tabitha over at Vintage Lucy's sent me a few of her designs and let me create something to coordinate. Wait a second, need to backup, have you ever checked out Vintage Lucy's? Serious yumminess. Vintage graphics with an oh so fresh feel to them. Her store literally carries something cool for every person in the family, young and old.


Kids just grow up too fast and I think we need to fight the urge of adopting the slightly older girl styles until well...they're older! I know that's why I was immediately drawn to her brand, it's youthful, fresh and I delighted in the opportunity in designing a new piece around her graphic. I'm loving summer blues with soft corals and crisp white so this little # is definitely one of my new favorites. Add cowgirl boots and well..you've hit perfection!


After that comes together it's even more fun seeing the pictures come to life through a sweet little model and talented photographer. One of my favorite things is seeing my pieces through someone else's eyes. If you are lucky enough to live in the Birmingham, AL area, you MUST check out Heather Swanner Photography. What a talent behind the camera she is. You can see the full album of photos on my Facebook page.

Monday, March 5, 2012

I tried going GREEN

No I'm not going green using organic fabrics exclusively. I recycle as much as I can already so that's not the big change in our house. I went green in the kitchen! Green as in I tried the green smoothie recipe I'd pinned a while back. Like any household, we go through spells of resolving to add in more veggies and make an overall attempt to eat healthier. My kids are decent eaters but they definitely stay in the predictable zone of veggies they'll try. Corn, peas...you know the easy starchy ones. We've been on a smoothie kick lately ever since we got THIS kitchen gadget. Love it, works great!! Since we've been on this kick, I figured, that'd be a great place to mix things up and sneak in those things they'd normally never try.....spinach!


I grabbed all of the ingredients shown below found originally on this Skinny Taste website. but will throw in my own notes or substitutions. I didn't use Greek yogurt. I used the Yoplait light and fit vanilla yogurt just to cut down the overall calories. Love the creaminess of Greek yogurt but wanted to save on calories. I also ended up buying a can of pineapple chunks. I just have to be realistic about my shopping tendancies and buying the canned pineapple that can go on a shelf so it's there anytime I need was just a lot more practical. My grocery store didn't have anything that said light coconut milk so I just grabbed the lowest cal stuff I could find.

Skinny Green Tropical Smoothie

Ingredients:

3/4 cup light coconut milk
6 oz fat free Greek yogurt
3/4 cup fresh pineapple, cubed
1 ripe medium banana
1 cup spinach - tightly packed
2 tbsp sweetened shredded coconut
1 1/4 cups ice


I have to say, it was a great smoothie!!! It might look like split pea soup but it was great. Not quite as delish as ones we typically make filled with a lot more yogurt, using V8 splash juice for my liquid and naturally being overall sweeter but this is definitely something I'll make again. Considering how much spinach is in it, this gets 2 thumbs up. I did end up adding more ice, it wasn't the consistency I like so wanted to thicken it up. I know I'll have to get my kids over the fact that it's green but I'm certain they'll love it and I'll consider it a success we are all taking in that much spinach.

I kept a calorie tally of everything I put in. The recipe makes 2 servings, each 200 calories. Satisfying and takes the edge off the hunger pains that hit me hard mid-afternoon. When the kids get home from school this will be one of my new snacks I'm going to put into rotation to keep me from grabbing the bags of salt and vinegar chips I love so dearly!


My 2 youngest kids came home so I could get little people reviews. They seemed unenthusiastic as they asked what all was in it. I knew the color would throw them off. Happy to report, we got 2 thumbs up!

Enjoy and if you have any substitutions or additions you've used, please comment. I'm always interested in mixing things up in new ways.